Overview of our low-code interface
This interface has been created to make APIs and automation accessible to technical but non developers users. Everything can be created with Blocks and some Javascript code to manipulate data.
The aim of this interface is to mimic some developers concepts without having to master a programming language. So we'll speak of algorithms, variables, for loop, etc.
Interface and main components
Lumo interface work with blocks. Each block will be translated to code and will be executed from top to bottom, in order.
Each block can be one of the following (in order)

- Variable: declare new value under a name to use it (and re-use it) inside your blocks. Perfect to use the same value multiple times.
- Function: write some JavaScript code or pre-built function (coming soon) to manipulate data
- Return: stop your Spell execution and return some values
- Loop: iterate over a collection of elements (called
array) and execute some blocks for each item - If (condition): to create conditions and execute blocks only if conditions are meet
- Connector: to use an app or services (thought his API), for retrieving or pushing data
You can add a block at any time by clicking on the plus button between each blocks
See below for more information on how you can use these blocks
Blocks
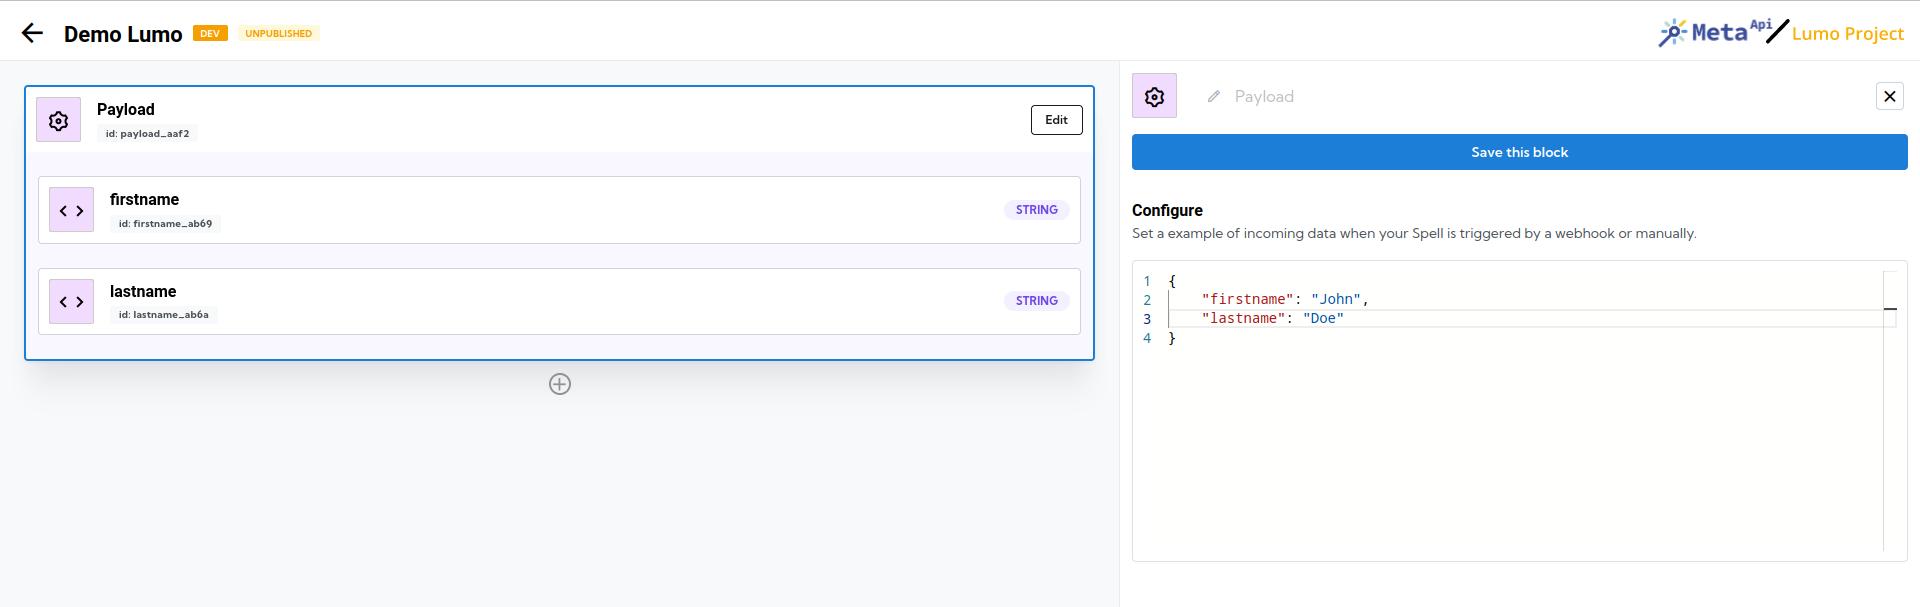
Payload
Payload is a special block: it appears only once and will be at the top of your Spell.
This block will contain all the data if your Spell is triggered by a webhook or manually. You can edit it to customize your example data during the development.
If you edit it, you'll access a code editor to write a JSON object that'll reflect your payload. Variables, based on the provided value, will be generated automatically.
Some generalities
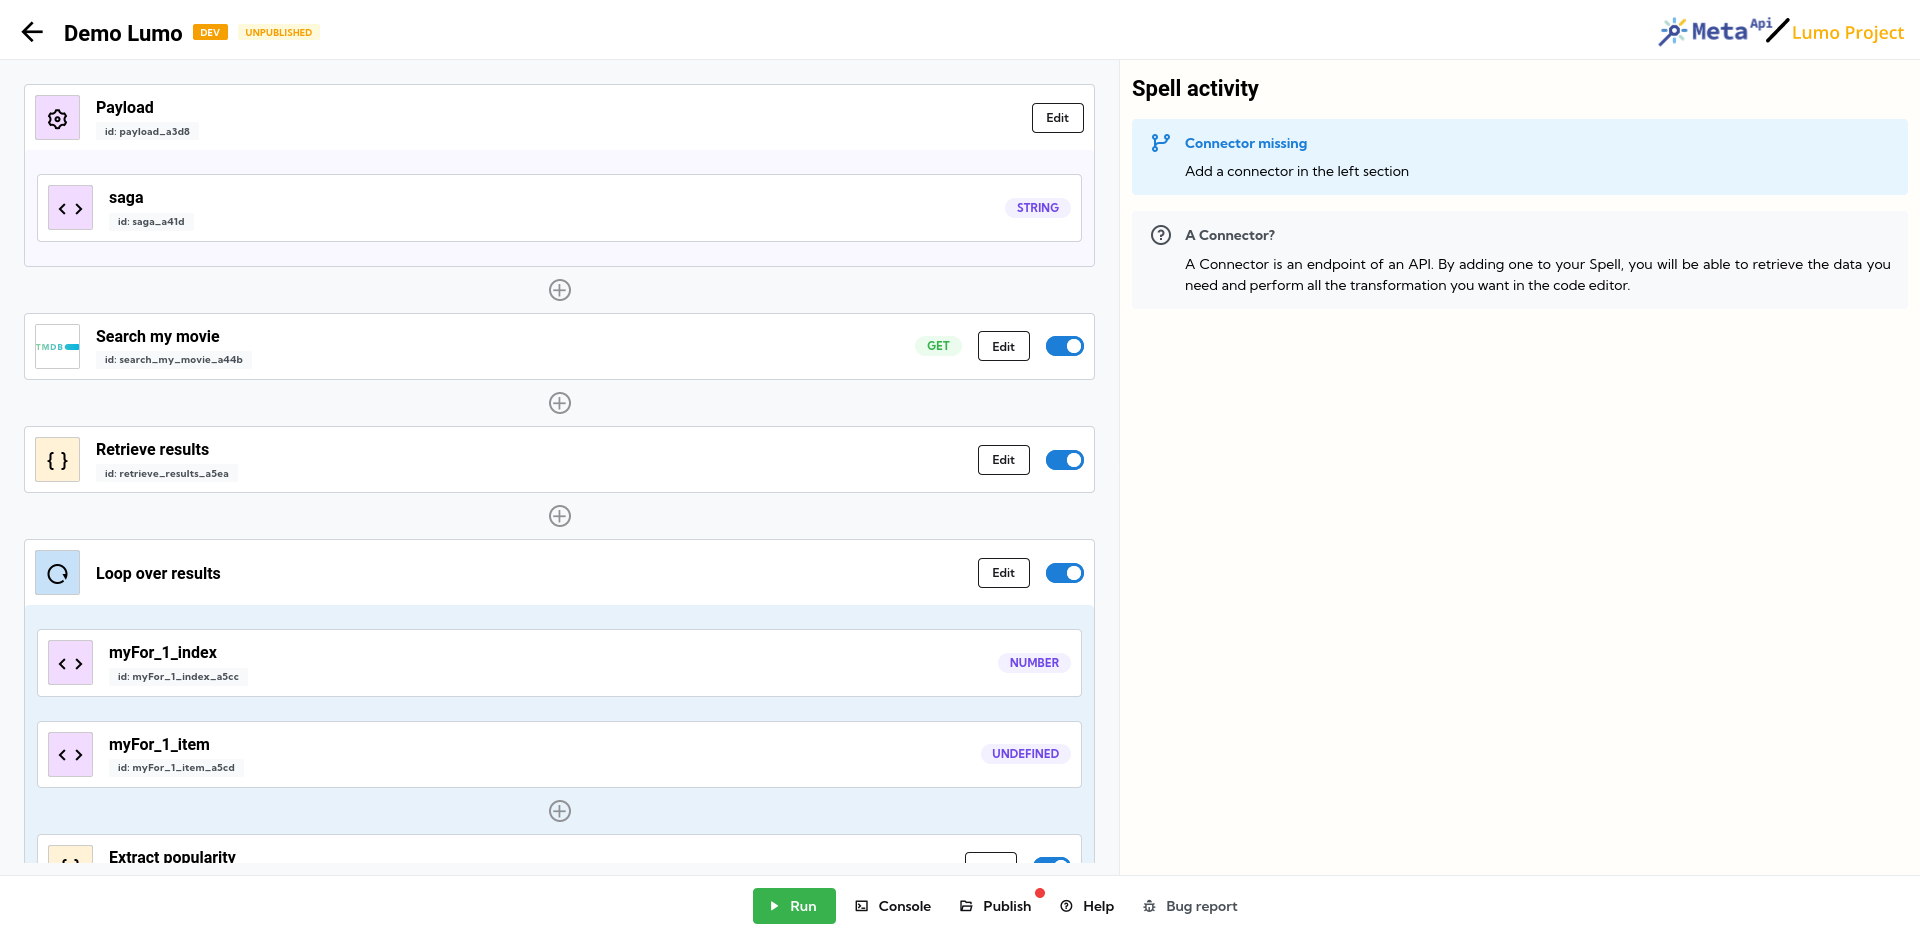
Each block work in a common way

- Name of your block, can be customized
- The internal variable name of your block. You can use it inside functions and others blocks manually
- The return type of your block (if applicable)
- The edit button to open your block's details inside the right panel
- A toggle to enable or disable this block
All blocks shared also the same header inside the detail panel
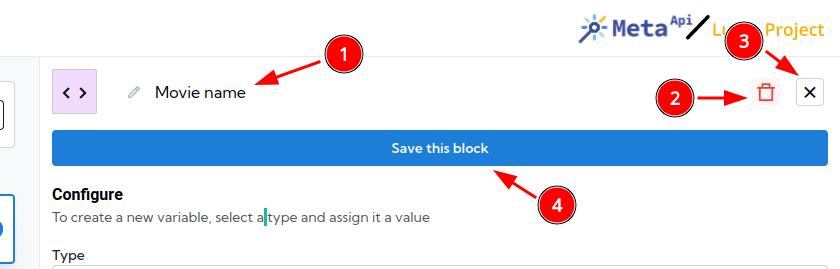
- Name of your block, you can edit it directly
- Delete button to remove your block
- Close button to close this detail panel
- Save button to save your changes inside your block
Variable
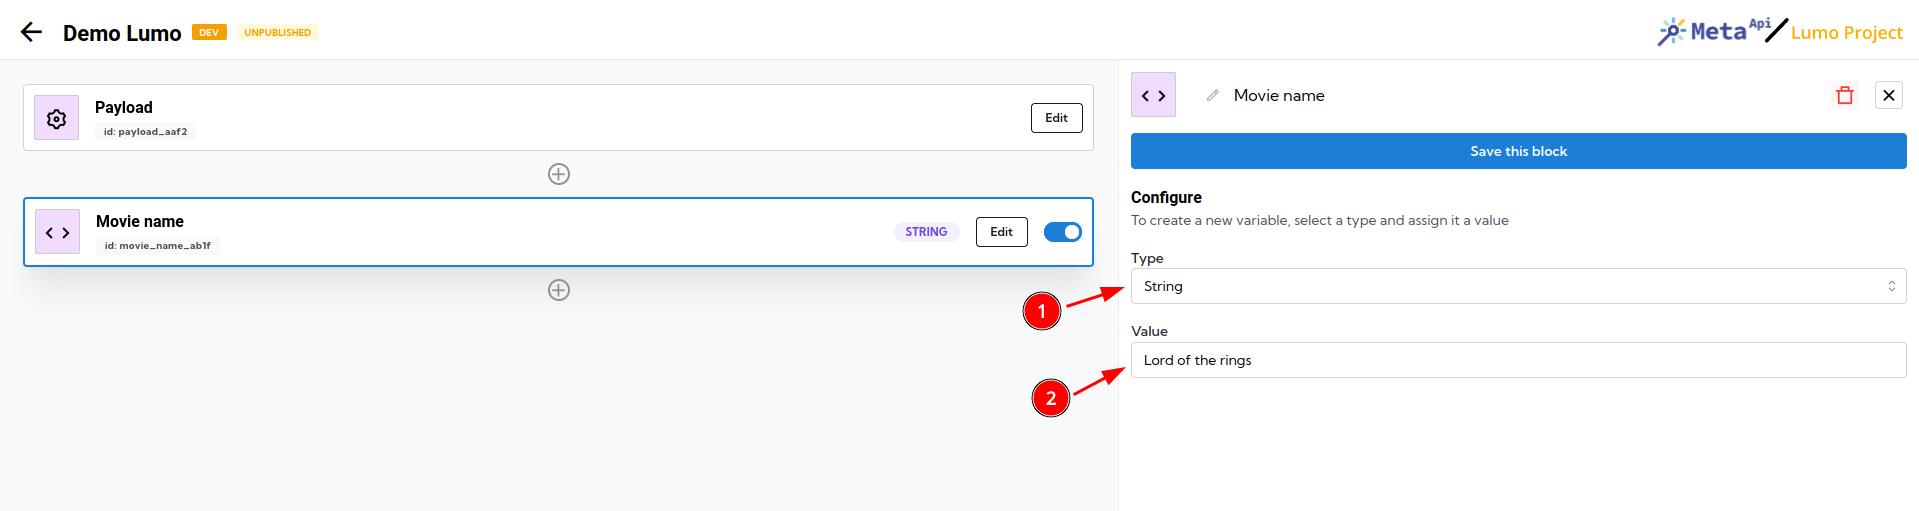
- Type of your variable. Can be: string, number, boolean, date, object, array
- Value you want to assign to your variable. Depending on the type, you can have multiple a simple input or a code editor.
Inside this example, we have created a new variable named Movie name (with the technical name movie_name_ab1f) which contain a string and the value Lord of the rings.
Later, if I want to change the value of this variable, I can simply edit it and change the value. Everywhere you have use it, it will use the updated value.
Function
This block will allow you to make any data transformation and manipulation you want with Javascript code and, soon, some prebuilt function.
If you want to create some filters, calculation, change the shape of data... you can do anything inside!
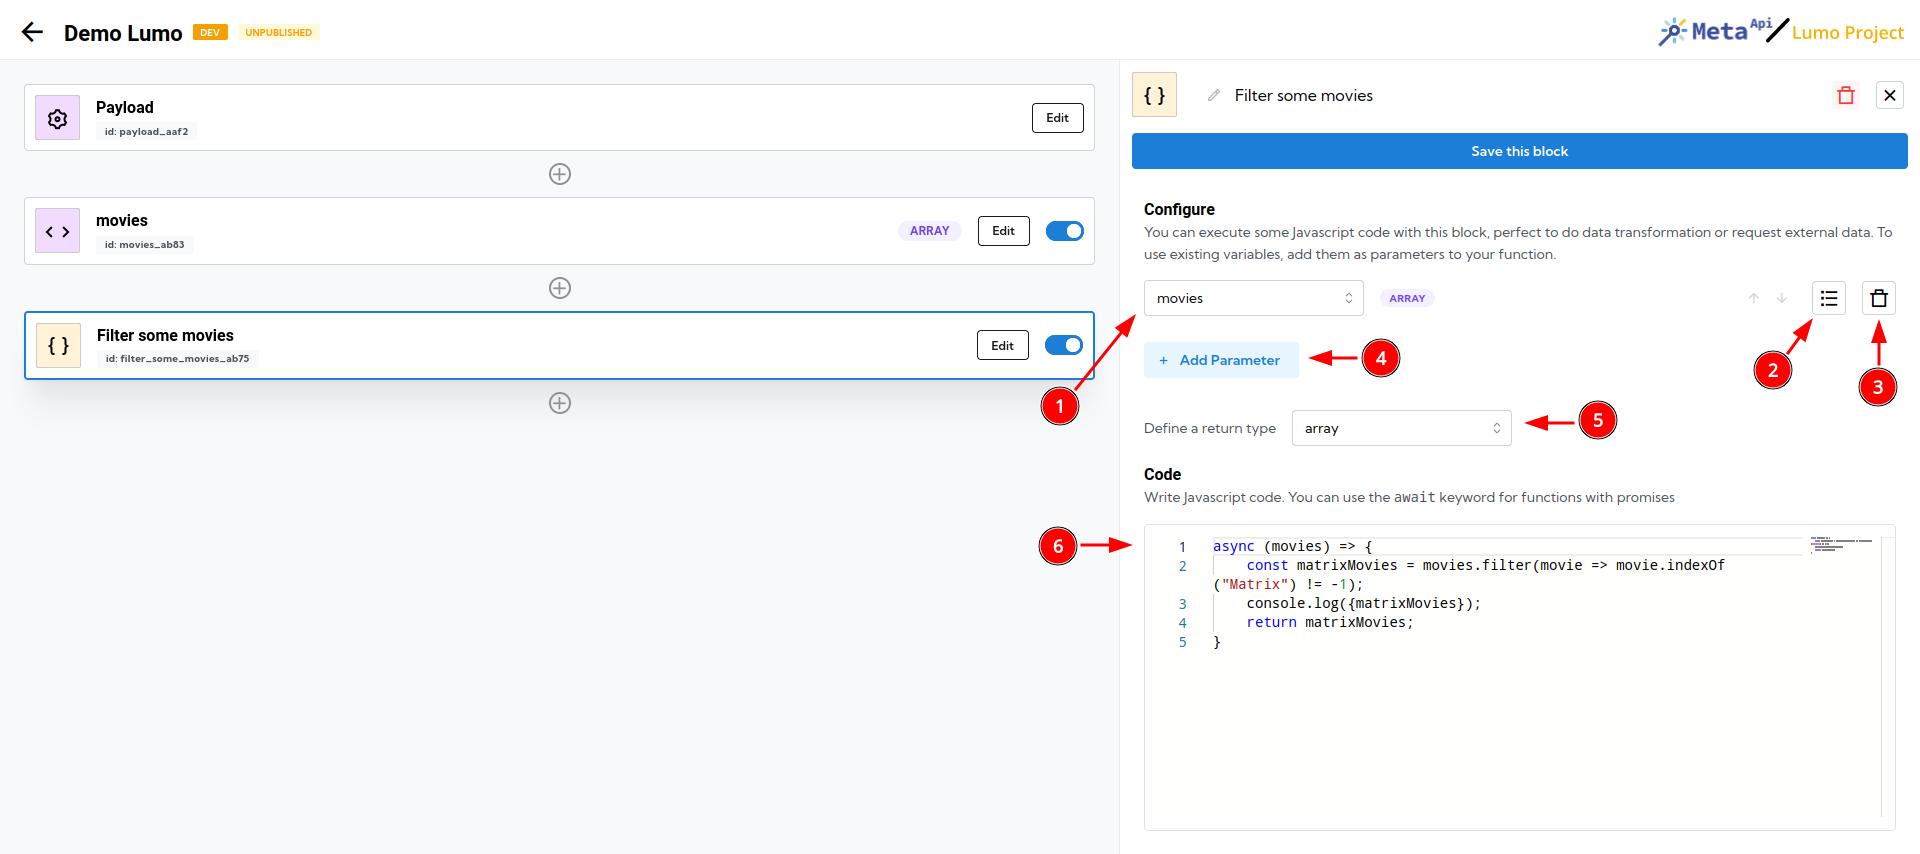
- Variable selection: see all the variables use as parameter of your function
- Variable options: customize your variable, like his name or default value
- Remove a variable from the list
- Add a new variable and enable the variable selection
- Define the correct return type for a smarter variable selection inside the others blocks. If you don't know what value you can choose, you can use
any - Code editor to write your code. You must finish your function with a
returnkeyword if you want to assign a value to your function (to use it later)
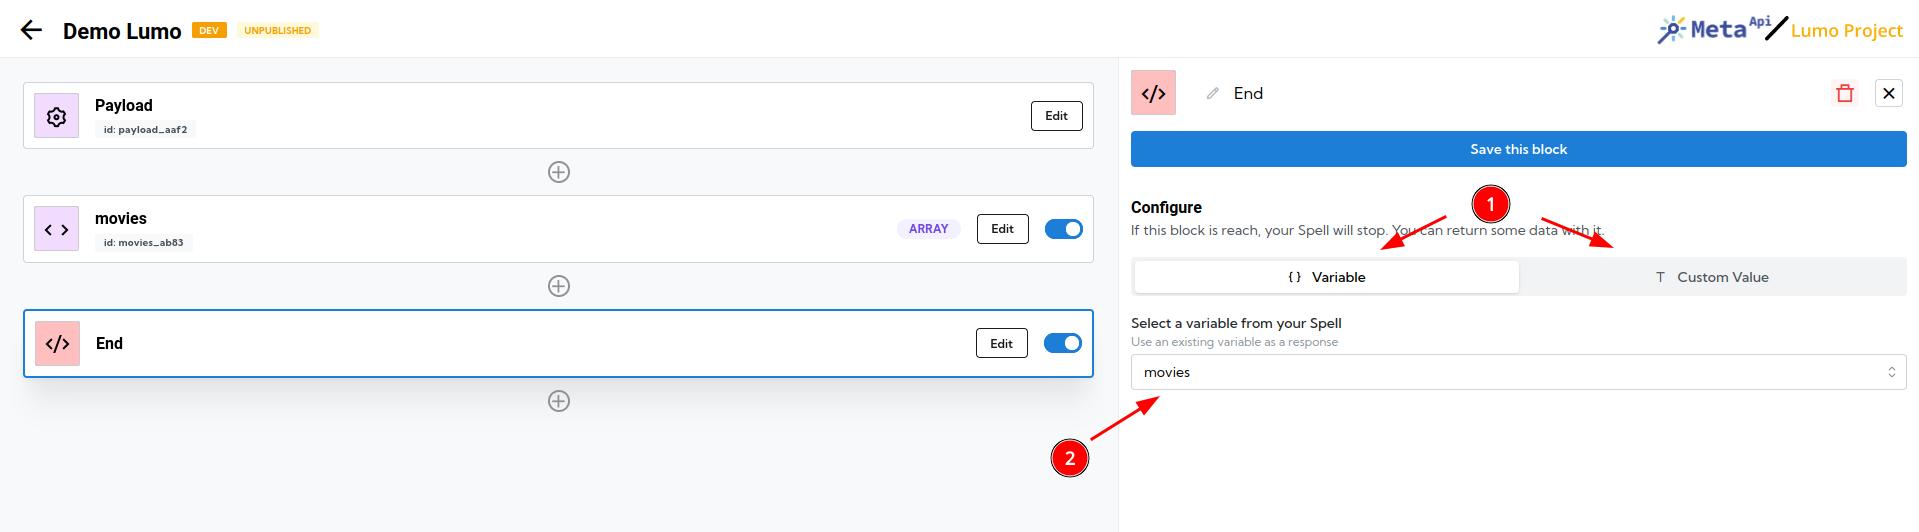
Return
This block allows you to stop your Spell and return a value.
Loop (iteration)
If you have to deal with arrays, you'll have to iterate over each item to manipulate data and process it. The FOR block will to it for you and allow running blocks over each item inside your arrays.
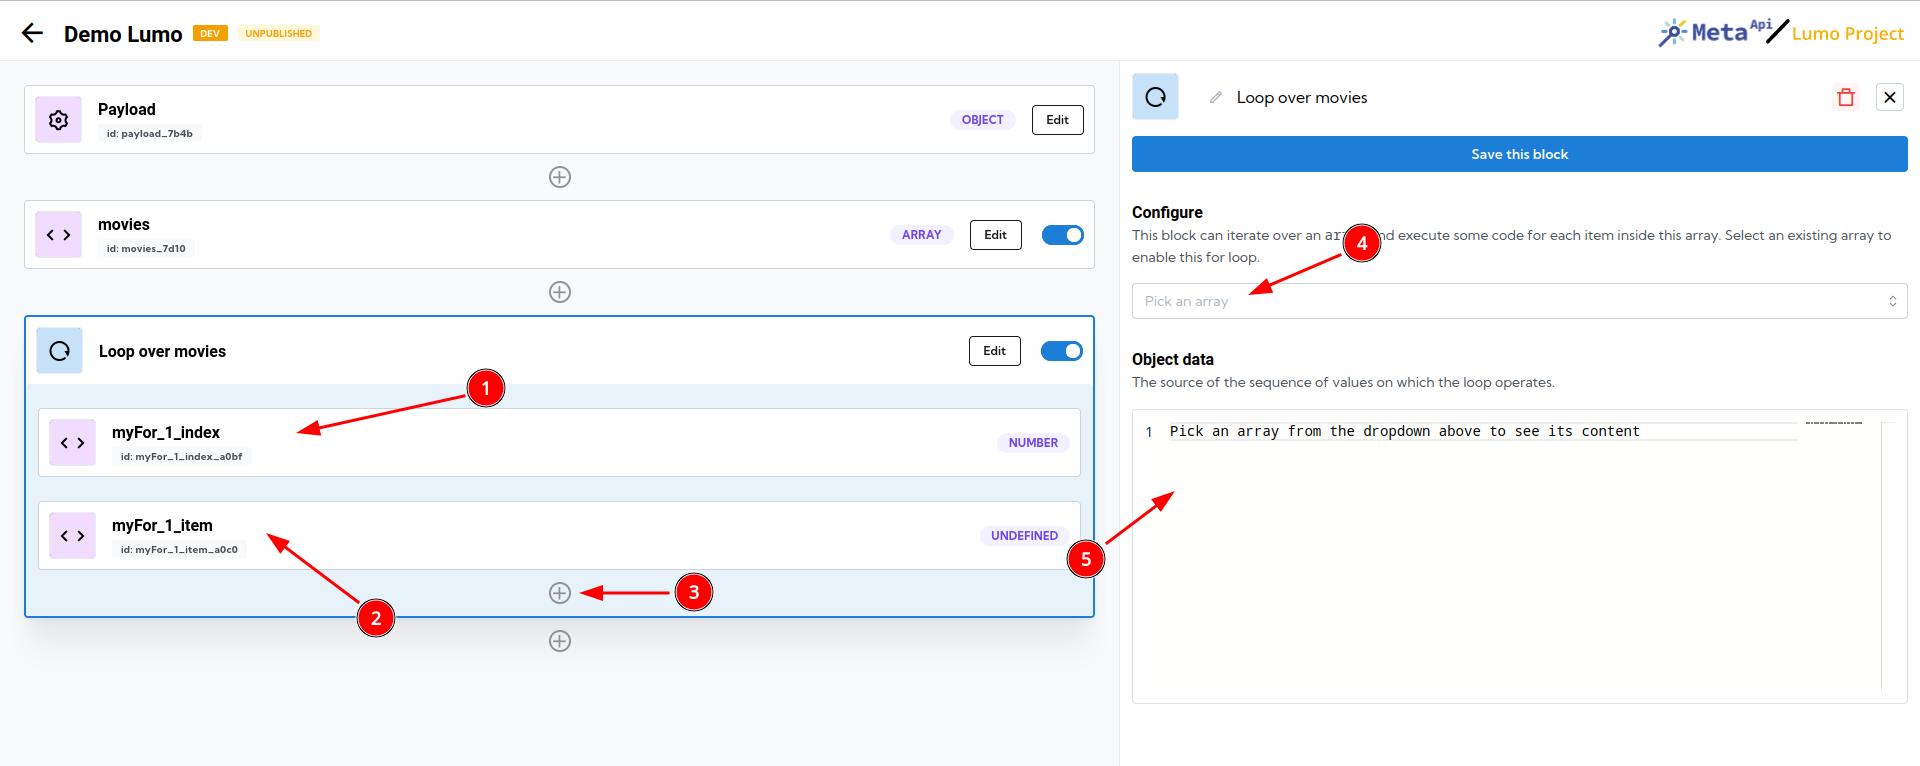
- Index will be a number, increasing while going through each item
- Item will contain the value of your object, string, number, etc. inside your array
- You can add blocks inside your for loops: they will be executed for each item
- Select the variable containing your array
- Have a preview of data inside your array
Condition (IF)
Condition will allow you to execute blocks based on some pre-determined conditions.
At the end of an IF, you'll exit the condition and go back to the main execution.
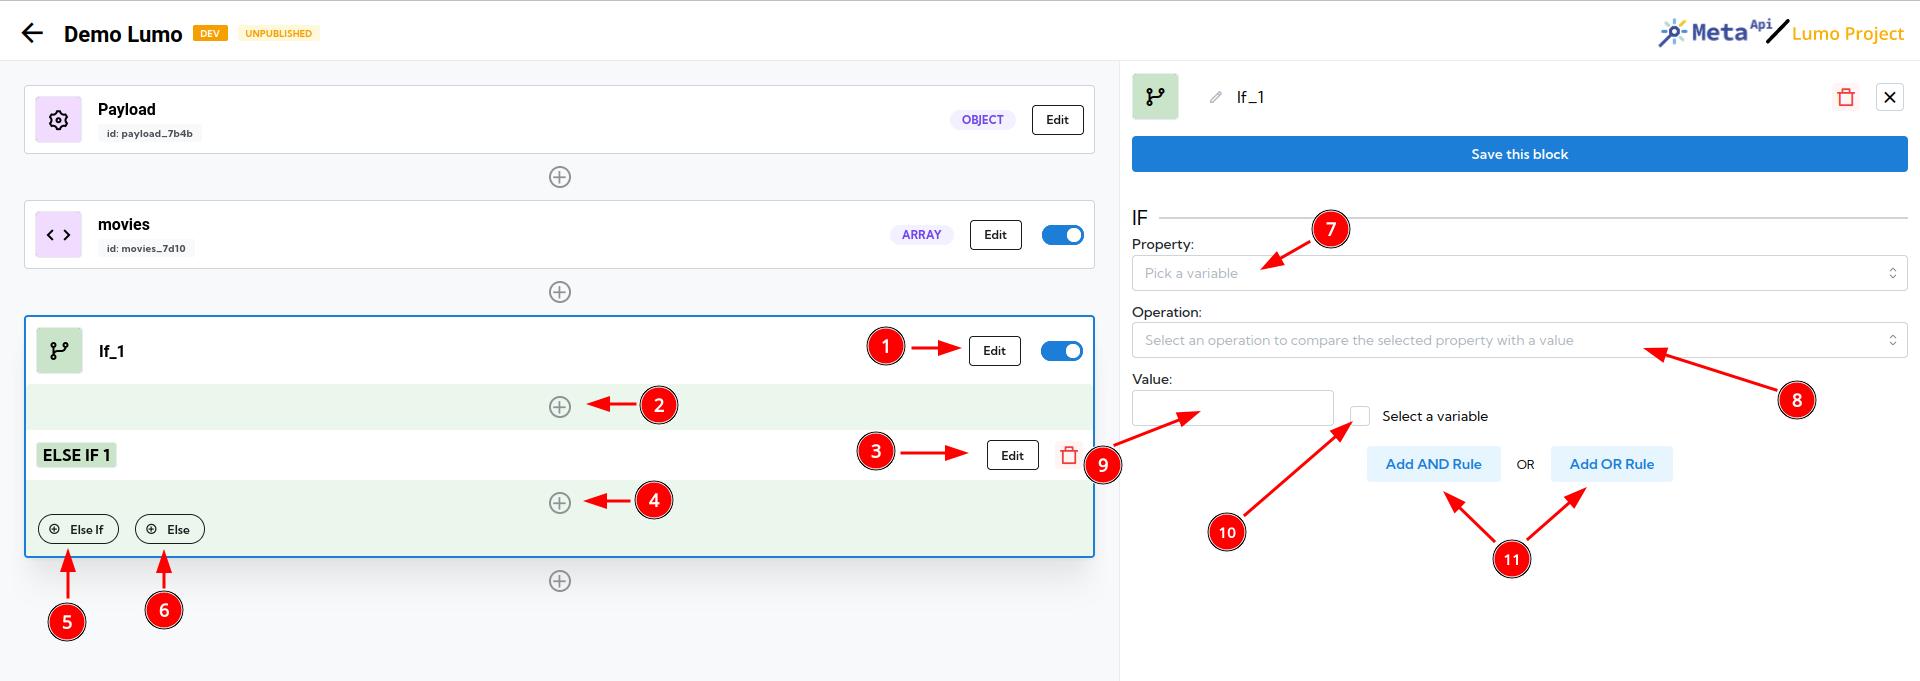
- Edit your main condition
- Add blocks inside your main condition
- Edit an "else if" condition
- Add blocks inside your first "else if" condition
- Add another "else if" condition
- Add an "else" condition if the main condition or any of the else if conditions has been met
- Select the variable containing the property you want to put on a condition
- The operator will determine the kind of condition you'll apply
- Insert a raw (static) value...
- ... or select another variable you'll compare against
- Add others ADD and OR rule for your condition
Connector (for apps and services)
The connector block will trigger or push data to others apps and services using APIs. Use them to build interaction between multiple platforms.
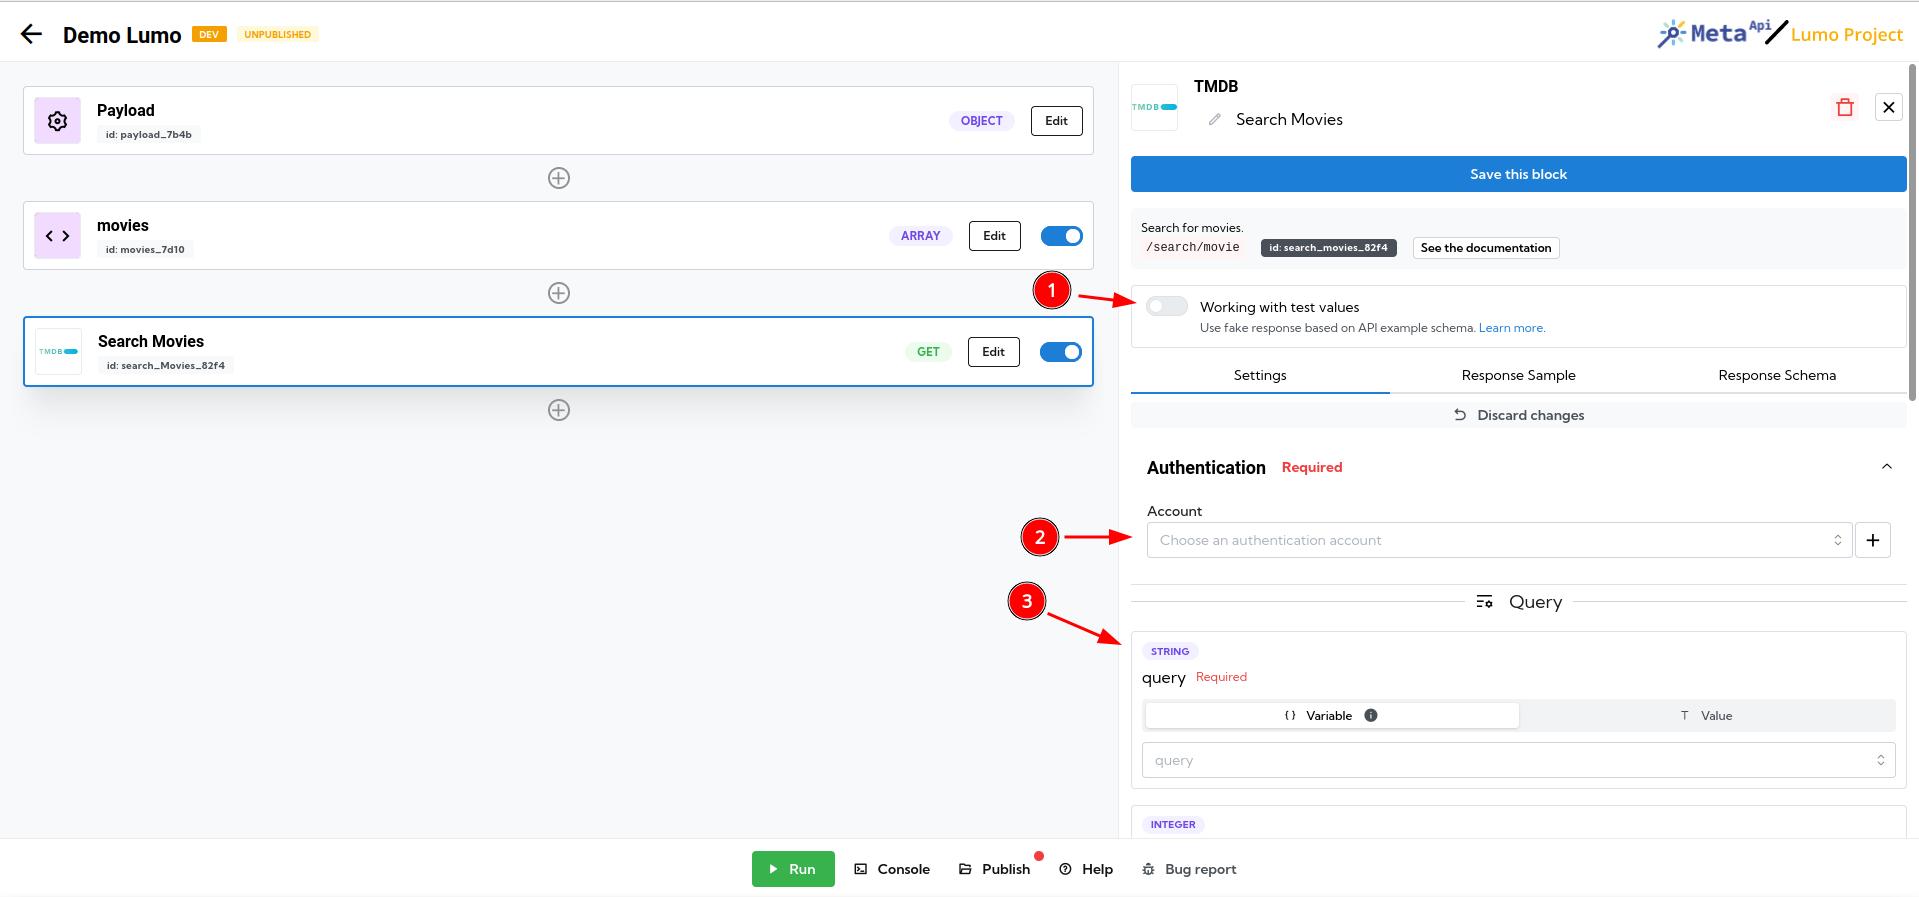
- Enable "fake requests" if you want to use the connector without having to configure the authentication
- Configure your authentication account to work with real data
- Configure all parameters exposed by the apps with variables or direct values